
Create holy-grail layout
holy-grail layout.Holy-grail layout
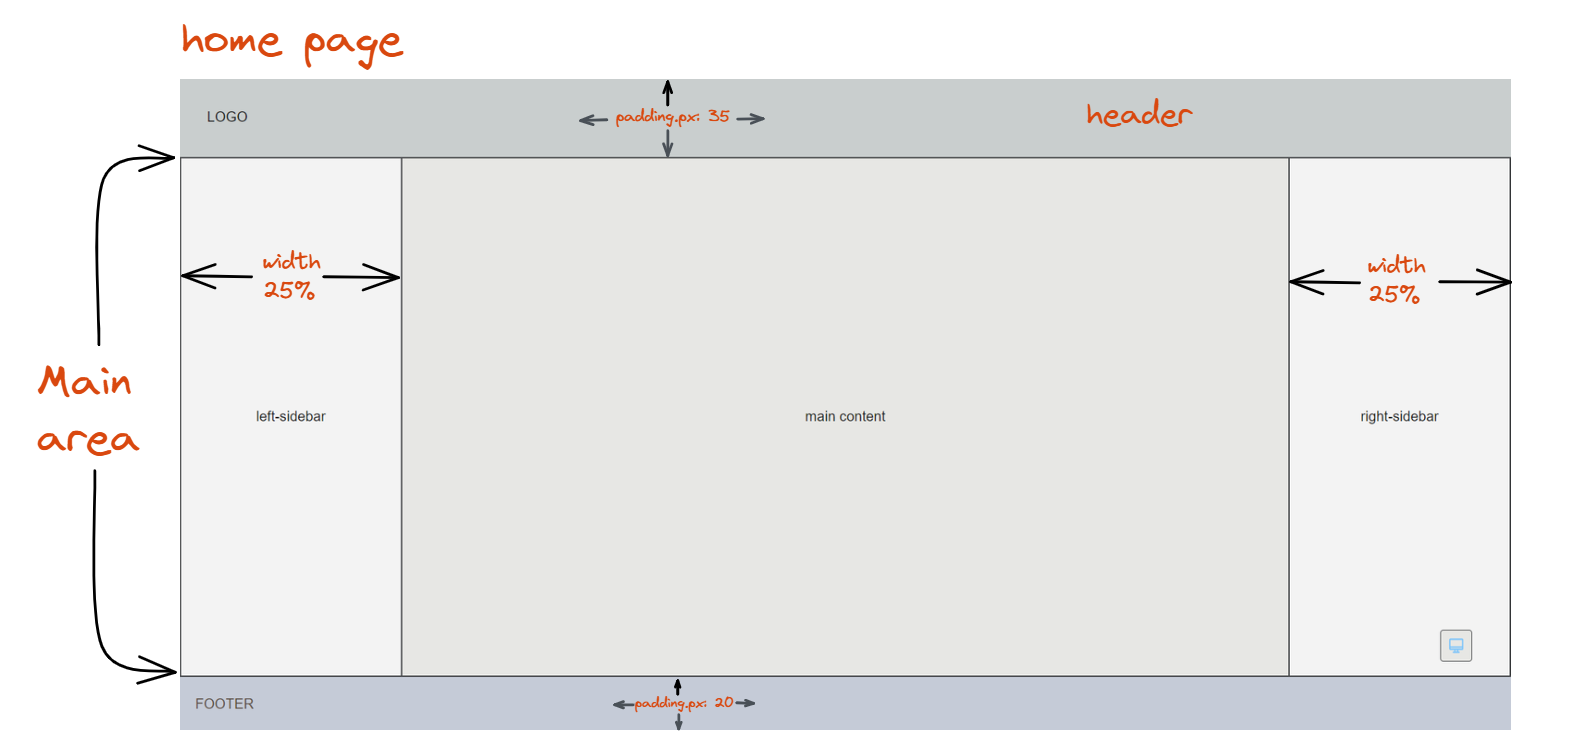
holy-grail layout. This layout is designed to optimize the use of screen space by dividing the webpage into three main sections: - a header at the top
- a main content area in the center, and sidebars on both sides.
- a footer
home-page component
We will start by creating a component that will be for the entire page.
The three parts of the home-page, ie the header, the main part and the footer part, are aligned in from top to down manner.
So, inside the componenthome-page we will use ftd.column.


-- component home-page:


-- ftd.column:
width: fill-container
height: fill-container

-- header:

-- main:

-- footer:

-- end: ftd.column


-- end: home-page
Header component
-- component header:


-- ftd.row:
width: fill-container
background.solid: $inherited.colors.background.step-2
padding.px: 35

-- ftd.text: LOGO
role: $inherited.types.copy-regular

-- end: ftd.row


-- end: header
We have given some properties width, padding, and background color to the row, note, we are using $inherited for background color so that if we use any
color-scheme, it will take the background-color defined in that color-scheme.
And for now, I have given a child to the row as ftd.text with it’s inherited role.
We have one component header ready, we can display it. So before we move ahead, let’s comment others (main and footer) and display header by calling the componenthome-page. To call it we will write:-- home-page:
Main component
Now, similarly, we will build the main area.
As I have mentioned, in theholy-grail layout main area has three parts, which is in left-to-right manner therefore we will put them in a row.-- component main-area: -- ftd.row: width: fill-container height: fill-container background.solid: $inherited.colors.background.base -- left-sidebar: -- content: -- right-sidebar: -- end: ftd.row -- end: main-area
left-sidebar component
-- component left-sidebar:


-- ftd.column:
width.fixed.percent: 25
height: fill-container
background.solid: $inherited.colors.background.step-1
align-content: center
border-width.px: 2
border-color: $inherited.colors.border

-- ftd.text: left-sidebar
role: $inherited.types.copy-regular

-- end: ftd.column


-- end: left-sidebar
This is the left-sidebar component. Inside the container component column of width of 25% has a child ftd.text.
content component
-- component content:


-- ftd.column:
height: fill-container
width: fill-container
background.solid: $inherited.colors.background.base
align-content: center
border-top-width.px: 2
border-bottom-width.px: 2
border-color: $inherited.colors.border

-- ftd.text: main content
role: $inherited.types.copy-regular

-- end: ftd.column


-- end: content
right-sidebar component
-- component right-sidebar:


-- ftd.column:
width.fixed.percent: 25
height: fill-container
background.solid: $inherited.colors.background.step-1
align-content: center
border-width.px: 2
border-color: $inherited.colors.border

-- ftd.text: right-sidebar
role: $inherited.types.copy-regular

-- end: ftd.column


-- end: right-sidebar
footer component
-- component footer:


-- ftd.row:
width: fill-container
background.solid: $inherited.colors.background.step-2
padding.px: 20

-- ftd.text: FOOTER
role: $inherited.types.copy-regular
color: $inherited.colors.text

-- end: ftd.row


-- end: footer
Our footer is also ready, so we can remove the comment in the home-page and Save and refresh the browser.
Now we have the complete holy-grail layout for the home-page.
I hope you have found this layouting using fastn language easy.
Before we close this, let’s see the basic way to add the header links.
In the package, I have created 3 dummy files that will repesent the sections.
And, inside the row of the header component, we will add another row and to this row we will give three sections as text.-- ftd.row: spacing.fixed.px: 50 -- ftd.text: Section 1 link: /section-1/ color: $inherited.colors.text -- ftd.text: Section 2 link: /section-2/ color: $inherited.colors.text -- ftd.text: Section 3 link: /section-3/ color: $inherited.colors.text -- end: ftd.row
ftd.text and ftd.row.Getting Help
Have a question or need help?
Visit our GitHub Q&A discussion to get answers and subscribe to it to stay tuned.
Join our Discord channel and share your thoughts, suggestion, question etc.
Connect with our community!Found an issue?
Quick links:
Join us
We welcome you to join our Discord community today.
We are trying to create the language for human beings and we do not believe it would be possible without your support. We would love to hear from you.


